
Getting around by bicycle is a liberating experience. Once you make the decision to leave the car at home the first time, taking the car will always seems like second choice. After your first few trips by bicycle you will begin to think of ways of doing all of your transportation by bicycle. You will begin to devise ways to complete the most onerous of errands by bicycle and even the impossible tasks will not be forfeited without a fight.
On most rides you will need to carry only the essentials. My essentials amount to a satchel (or purse), Rain Legs® and extra mitts and a balaclava in winter. The only other items are a few bits and pieces of projects I am currently working on and a few tools.
Therefore a large wooden crate does not appeal to me for the reasons mentioned in Part I of this post. I much prefer small wooden boxes with a lid or some other similarly sized up-cycled item designed for carrying a small amount of stuff. That brings us to two of my favourites: the vintage metal picnic basket and hard-shelled luggage vanity.
Metal Picnic baskets made in the c.1950’s from General Steel Ware (GSW) and similar companies have much to offer. Their size, at approximately 10 x 10 x 12” (25 x 25 x 30cm), is almost perfect. They are neither too high nor too long to be interfering with your saddle or hanging off the rack significantly. My favourite feature is a lid that completely seals the contents from any form of moisture that should test it. The weight (~2.5 lbs; 1.2 kg) is half or less than that of even most smallish wooden crates. The ~1 cubic foot volume is often more than enough for the essentials and a few extras.
 |
 |
 |
You can usually find these baskets on Etsy, and at yard sales and flea markets. The variety available is catalogued well on Pinterest. As with anything that increases in popularity or function, the price will rise to reflect that.
Before you buy ensure that the joins and hinges are still sound. It is not uncommon for the joins near the top to begin to open up. The second thing to look at is the hinges. They too can become de-crimped. The third would be the handle rivets where they attach to the sides. Although some rust is typical, look for one that has minimal rust. Some baskets have a painted interior and others are left as bare metal. Painted is always preferred.
Since you are likely choosing this item for aesthetic as well as functional elements, you will want to know if it has been cleaned. The best looking ones will have been cleaned and treated with a rust remover/neutralizer. As added protection they should be waxed or sprayed with several coats of lacquer. The ones sold by FreeLanderBicycles through Etsy are treated this way. Don’t buy the first metal basket you happen upon. Watch for a good one, as described, and expect to pay between $35-50 CDN ($25-35 USD) for it.
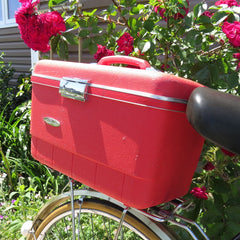
Then there is the Hilton of Bicycle Trunks. The hard shelled (Samsonite) luggage vanity. I mention a brand name here because they are the best. The Sears “Forecaster” model is a close second. The appeal of vanities is their perfect size and style. At approximately 14" (36cm) x 8" (20cm) x 8" (20cm) they fit neatly behind the seat and do not extend beyond the length or width of the carrier. With a lid (that often locks) and detailing typical of 1970’s luggage they really are handsome.
 |
 |
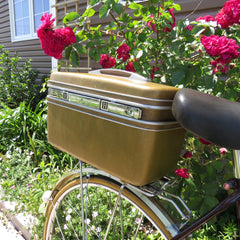 |
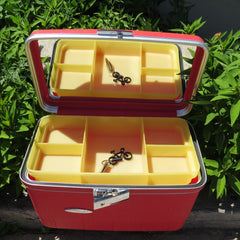
| Sears "Forecaster" | Interior with tray and mirror | Samsonite |
If you are looking to carry just a few personal belongings like a small purse, lunch, book, hat and a few tools, these are great. Many also contain a tray, useful for items like keys, hand cream, etc. On all the vanities I have up-cycled, a mirror in the lid is a standard feature as are 1-2 pockets. Some have a fabric lining as well.
The only concerns are the condition of the plastic. All of the Samsonite and Sears brands I have seen were in excellent condition. I have seen one other (name unknown) whose plastic was thin and had dried and cracked. A few minutes looking closely at the exterior will tell you whether the condition make it worth purchasing.
Vanities seem to be increasing in price. Whether you plan to use one as a bicycle trunk or not, they make wonderful pieces of luggage even today. Expect to pay the same as you would for a metal picnic basket ($35-50 CDN ($25-35 USD)) from a seller. Again, it should be thoroughly cleaned and in very good to excellent condition. If you find it for less, grab it.
Installation
Regardless of whether you have a wooden crate, picnic basket or vanity, the installation is the same. The most important step is determining the position. Position the trunk on the rack so that it is far enough back not to interfere with you saddle and riding comfort. If it has a lid, be sure it can open freely (i.e. clear the seat). It is no great concern if it hangs over the back of the rack slightly.
Racks (carriers) are all different. Some have rails, cross members and decks that need to be worked with when fastening your trunk. Ideally while the trunk is in position, the holes to be drilled should be marked from underneath, using a Sharpie®. I prefer to drill the holes so the fasteners are located on the out side of the rails if possible. If the combination of the rack and trunk prevent this, then look at moving the holes/fasteners to just inside the rails as long as the brace extends far enough under the rail so that any shifting will not have the trunk detach. Once the position of the holes are marked, remove the trunk and measure the distance of the holes from the sides and each other and adjust to ensure they are evenly spaced. Finally drill the holes, from either direction using an appropriate size and style bit for the material and fasteners to be used. Be sure to take the time to do it right.
The choice of hardware is between wood and metal plates. I use both. I prefer wood for wooden crates and metal for picnic basket and vanities. The wooden braces need to be cut to length. I generally use 1/2-3/4” thick by 1-1 3/4” stock. Maple, oak, birch and poplar are best and pine and spruce will do (although a little too soft in my opinion). Each (2) of the rack braces will have two holes drilled in the middle of the width the same distance apart as the holes marked on the trunk. If using metal braces you are limited to the position of the pre drilled holes. I find this painfully limiting. If you’re lucky, they will align with the holes marked. However, more often than, not you will need to reposition the holes on the trunk to meet with the holes on the brace. Do not compromise the union between the trunk and the rack with poorly positioned holes. If necessary, consider drilling new holes in the metal braces to match the ideal location in the trunk.
 |
 |
 |
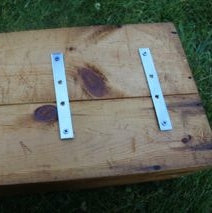
| Wooden Braces on Bottom | Steel Braces | Interior Brace |
Fasteners should be stainless steel or galvanized. The diameter should be sufficient for the task (#8 size). I prefer a pan-head that sits flush on the inside of the trunk. Whatever trunk you choose, use a interior brace or suitably large washer (e.g. fender washer) to prevent the bolt from pulling through and/or damaging the trunk. Once the bolts pass through the trunk, rack and exterior brace, install a washer of suitable size and a nylon lock nut. Nylon lock nuts are really dependable for keeping your trunk in place. You can let the bolts travel in either direction (inside to outside or vice versa) based on preference. Tighten until good and secure but don’t over tighten.
Ride cautiously for the first few trips and adjust if necessary. Also be sure to get a feel for how the trunk and contents affect the handling of your bicycle.
A complete guide to installing a pre-drilled trunk can be found at: https://snapguide.com/guides/install-a-freelander-bicycles-bicycle-trunk-1/
We list of our trunks on Etsy. It seems to work better for this item. You can find them at https://www.etsy.com/ca/shop/FreeLanderBicycles as well some of our other up-cycled goods.
Thanks for reading. If you have any comments or questions, feel free to join n the conversation.
Take care, Daryl
2 comments
Hi Harriet,
Sorry for the late reply. I am just getting familiar with blog posting and comments. I treat them as I would the paint of a bicycle. I clean them thoroughly then polish using a rubbing compound. I think I am using a Turtle Wax compound now. It really removes the small scratches. Then I aplly 2-3 coats of a carnuba auto wax (Mother’s currently). They really come out looking great. I hope this helps a little. Love to see you basket when its installed!
Take care,
Daryl
Thanks, Daryl! Those are great ideas and instructions. How do you wax your picnic tins?
Harriet